Thursday, August 28, 2008

Calgary Weekly Ride MKII


After starting strong in the Spring the last few weekly rides have been poorly attended. I'm not sure if Wednesday is not a good for people at this point, if interest in a weekly group ride is simply not there or if some other factor is at play. I don't think that having a weekly group ride makes much sense if we can't sustain a turn out of 5 riders or more. Particularly as we have well over 20 people that have either come out or expressed an interest in coming out.

We have a number of options from canceling the weekly ride and talking about it again next Spring, changing it to a monthly ride, changing the day of the week and getting some sort of notification system going. To make any decision we need to have a discussion. I've setup a Google Group called "The Lazy Randonneurs". If you are interested in this weekly ride please take the time to join. We can use this forum to discuss what people want to see happen with the weekly ride and should few people bother joining I'll take that as a vote to cancel the ride until next year.

Ride Notification


In the meantime we have some good weather left and at least a month of weekly rides that could be very pleasant before winter sets in. In order to temporarily resolve the issue of low attendance if you plan on coming out for the ride join the The Lazy Randonneurs Group and send out an email by 4pm the day of the ride. That way it will be easy to see how much interest there is in meeting up. If only one or two people are interested at least they know it will be a small turn out and can decide to bail on the ride. You can also use this ride notification process to let people know you are interested in riding on a day other than Wed. So if you want some company on a Sunday AM ride send the group an email and see if anyone else is interested.

Make sure you wear your helmet - when you drive!


Click on image to read article. Click here to read the full study that is referenced above.

Monday, August 25, 2008

Thorn Accessory Bar Gripshifter Mounting

I figured for the sake of completeness I'd post all the ways I know of mounting gripshifters on drop bars. In the photos above and below you can see the longer Thorn Accessory Bar 105mm [~$28] mounted on my Sherpa. I used the bar to lower my handle bar bag and free up real estate on the drop bar, but you can use the shorter 55mm version to mount a gripshifter near the stem. You could mount a gripshifter on the right and a light or bike computer on the left making it quite versatile.


Hubbub Drop Bar Adapter for Gripshifters


Another option for using gripshifters on a drop bar is to use the Hubbub Adapter. This adapter mount in the end of your drop bar and is the right diameter to slide on a gripshifter of your choice. This works with Rohloff, Nexus, SRAM and Nuvinci shifters. A little pricey at $60, but I think this would be my prefered choice as I like having the shifter down at the end of the bar.

Of course if you've got some tools and DIY skills you can make a low cost adapter out of wood or metal and just glue it in the end of the bar.

Bar End Shifters and IGHs

Photo: Hiawatha Cyclery

Hiawatha Cyclery posted this cool idea of using a Shimano 8 speed bar end shifter with a Travel Agent brake adapter to operate a Shimano Alfine internal gear hub. Apparently the Travel Agent changes the amount of cable pull of the bar end shifter to match what is required for the IGH - cool...=-) Click here for more info.

Tamia's Bar End DIY Guide


Tamia has a well documented guide to removing/installing bar end shifters on her blog. If you are not clear on how to do this and want to tackle a relatively painless bike mechanic project bookmark her post. If you are not familiar with bar end shifters you might want to check out her post just to see how they work. I really like bar ends and they are pretty much my go to shifter for any application that they work for. Generally this doesn't include interhal gear hubs, but Hiawatha Cyclerly has come up with a cool solution that works [see post above].

Wednesday, August 20, 2008

Anna's LHT gets some bling!

When I went hammock camping with Anna a few weeks ago she mentioned she wanted to upgrade her LHT a bit. Although she has two other bikes her LHT sees 99% of her mileage and deserves a little love. I helped her figure out some options which either made her LHT nicer and/or replaced parts that were worn out. Everything has finally arrived so I'll be working on her bike over the next week getting it ready for her.

Here is what she is adding/replacing:
  • Berthoud 700c x 40mm stainless fenders
  • Grand Bois 700c x 30mm tires
  • Tan cork bar tape
  • Selle Anatomica Titanico saddle
  • SRAM PC-971 chain

We may also replace her stem for a better fit and her cassette/chainrings if they don't play well with the new chain - TBD.

Love the Cargo Bike!

I stole this photo from the Love the Fold Blog. I love the awesome cargo bikes and utility bikes I've seen in India and in photos from SE Asia. While I love the fold as well - I'm getting pretty jealous of all the great trips my blog-buddy is going on!

Monday, August 18, 2008

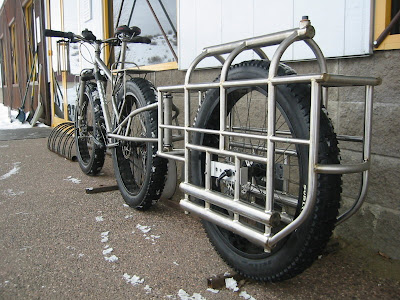
Monster Fatbike

Wow...found this photo on the Fatbike Alaska Blog. It makes my Big Dummy look puny - yikes! I don't know where this bike is going, but I'm sure it will be a totally ridiculous trip....=-)

Update: Mike pointed me to Mike Curiak's page of snow bikes. Seems it dates from a design he was testing in 2007. I was right BTW - Mike's trips look quite ridiculously amazing.

Sunday, August 17, 2008

Nivea's Do Everything Bike MK2


Nivea has only one bike so by necessity it's her commuter, touring bike and city bike. She has been talking about getting a new bike, perhaps a LHT [must be hanging around me too much!], but her existing bike was in dire need of an overhaul. Since I was supposed to take it easy this weekend and rest my battered body....lol....[yes I can tell I'm almost 40!] I decided to pimp out her bike.

Her bike is an old steel framed Rocky Mountain that is running an 8 speed drivetrain. Besides a totally worn out drivetrain she was getting heel strike on her panniers due to the short chainstays and her wheels/tires/brakes had seen better days.

I added the following parts:
  • swapped in some slightly used wheels [LX hubs & Mavic rims] that are much lighter and stronger than her beat up hoops.
  • new Continental Sport Contact tires [26 x 1.3"] which will be fast and durrable for her commutes
  • new Shimano 8 speed mega-range cassette which will give her a lower gear for touring in the mountains
  • new Shimano Deore crankset with 22/32/42 rings which is simple, but effective
  • new Shimano square taper BB
  • Time ATAC Control Z pedals so she can clip in or ride with street shoes when she just wants to cruise
  • new rear shift cable & housing
  • new Filzer PR-2 rear rack with a longer platform so she won't hit her panniers when pedaling
  • new SRAM SX-4 rear derailleur
  • new SRAM 8 speed chain
  • new Deore v-brakes front and back with red Koolstop pads
  • new brake cables and housing
  • Planet Bike Cascadia rear fender
  • SKS Shockboard front fender & MEC down tube splash guard
  • Planet Bike Superflash rear blinkie & front white LED headlight
  • Ergon Grips
  • Serfas mini-bar ends
  • bell
I'm pretty pleased with the result. The new drive train shifts smoothly and with new brakes & wheels the whole bike rolls along like a new machine. Hopefully the Egron Grips are comfortable. I had to move the controls inboard to make them fit so Nivea will have to see how the new setup feels.

The only thing I didn't swap out that does need love is her front derailleur. It's working, but a quick inspection revealed that it will need to replaced before next season. I'll keep my eyes open for a suitable candidate and put it on next time I work on her bike.

Although I think having a commuter bike and a touring bike would be great, her Rocky Mountain is a nice bike and could be made into a hardcore touring bike with the addition of drop bars and a LHT fork with front rack.


I love putting a new drive train on an old bike. It brings them back to life and makes them so much fun to ride again.

Full fender, slick tires, rear rack and blinkie turn this bike from sporty mountain bike into a practical hauling machine.

The new cockpit looks comfortable.

I love the Deore v-brakes beacuse they are cheap and work well. I couldn't resist upgrading the pads though. The fresh rubber will be fast for her commutes, but shouldn't get many flats.

The Deore crankset and mega-range cassette provide a useful gear range for everyday riding and touring in the mountains. Time ATAC pedals are versatile and don't need much maintenance.

Friday, August 15, 2008

Hennessy Hammock Trial PT 2

I went on an overnight outing with Joel on our LHTs to get another night of hammock camping in. Joel has had his hammock in use all of last year so he's a bit of a pro. We ended up setting up camp after dark again which meant less playing around and more focus on getting the darn thing up. Having setup my hammock once before under similar conditions I found it quite easy to get the shelter in place in a few minutes. I added a set of Snake Skins to my hammock [shown in photo above]. These are some sil-nylon covers that slide over the hammock and fly giving you a neat package that quickly goes from pannier to fully deployed. The covers protect the hammock from dirt and keep the material dry.

The main differences in how I setup up my hammock this time were that I guyed out the body of the hammock and fly to different points allowing for a nicer pitching of both elements. You can attach both guy lines on each side to a single peg, but you are limited as to how the fly hangs relative to the body of the hammock. I also used a full length thermarest rather than the 3/4 length pad I had with me last time.

All in all I had a better night's sleep. I was warmer and was able to lie flatter in the hammock. Although I'm just guessing I think the temps last night were warmer than my previous hammock trial. I wouldn't suggest using a hammock for cold weather camping unless you go out of your way to insulate the bottom of the hammock at which point I think you are better off with a tent.

The advantage I'm finding with this hammock isn't that it is uber light or super comfy....it does fine on both counts, but doesn't knock the ball out of the park. Where it does really stand out is that it allows you to camp really close to the road anywhere there are trees without being easily seen. This means you can ride as far as you like and when you are ready to camp you can simply pull off the road and go to sleep. Not how I'd want to travel on every trip, but I can definitely see some occasions where stealth camping would be a nice option.

Given the cold weather on the horizon and the fact my next few trips involve my girlfriend I'll be shelving the solo Hennessy Hammock until next year in favour of a 2 person tent.

Thursday, August 14, 2008

Sunday, August 03, 2008

Hennessy Hammock Trial

Vik's Hammock Trial Photos

Anna's Hammock Trial Photos

Anna and I bought a pair of Hennessy Hammocks [Ultralight Backpacker Asym] last year, but didn't get around to using them. As this camping season was winding down I realized we might go another year without getting our hammocks into action. Part of the reason we hadn't used them is the fact you tend to go with gear you know and trust for a tour. So we really needed to get our hammock skills tuned up so we'd feel good about taking them with us to the mountains. With that in mind we decided to head out to Banff on Friday evening and ride into the mountains and stealth camp somewhere along the road so we could test out our hanging shelters.

Of course it would have been too easy to test out the setup procedures at home. Heck I didn't even pull my hammock out of the bag to ensure all the parts were there. I did take the precaution of reviewing the video on the Hennessy Hammock site that shows how to attach the hammock to a tree. I figured I could fake the rest! On the drive up to Banff I realized we didn't have any tent pegs to stake out the flies on our hammocks so we picked up 4 pegs just to be safe.

Riding out of Banff at 9pm we made our way onto the Bow Valley Parkway as it doesn't see much evening traffic and would provide better camping opportunities. We really enjoyed riding as the light faded. This is a familiar route for us, but we had never done a night ride in this area. As expected the traffic died off and we had the road to ourselves. We each had a single Dinotte 200L-AA LED headlight. This was fine for cruising along at 20-25kph, but wasn't ideal for the fast downhills. Our familiarity with the road helped out when we were bombing downhill at 60kph, but I would have preferred having 2 headlights each. One quick safety note - although Anna had a Planet Bike Superflash on the back of her bike the reflective patches on her Ortliebs were much brighter when I aimed my light at her bike from behind. I'm a big fan of reflective gear and this demonstrated to me why that is a good call.

After about 30kms of riding and chatting we rolled our bikes down a hiking trail past the no bicycle and no camping signs! Finding a likely spot we pushed our bikes off the trail into the woods. I thought we were quite a distance from the trail when we stopped, but that was to prove incorrect the next morning. Setting up the hammocks wasn't too hard. For easy reference the instructions are printed on the hammock stuff sack. I would recommend watching the video on the Hennessy Hammock website as the drawing on the lashing you are supposed to use is not particularly clear on the instructions. The lashing itself is fairly easy to tie and the hammocks went up quickly. I'm not sure we setup them up perfectly, but they were tied up between trees and held our weight when we tested them. For our first time that was good enough for me!

We added the rain flies to our hammocks as the weather seemed unsettled. They clipped on the hammock support lines and then were guyed out to two pegs on the ground. The only thing to keep in mind is they are asymmetrical [like the hammock itself] so they need to be oriented correctly to provide proper coverage. After throwing in our sleeping pads and bags we jumped in for a night of hanging slumber. You enter these hammocks from the bottom through a velcro opening that is at the foot end of the hammock. This isn't too hard although I wasn't particularly graceful! Once you are inside the opening will seal itself and you need to wriggle your way onto your sleeping pad and into your bag. This is probably the hardest part of the whole operation, but I'm sure it gets easier with practice. You actually lie across the hammock diagonally due to the asymmetrical shape. This means you are lying almost flat which comfortable.

My night in the hammock was not bad, but I didn't sleep as well as I would have in a tent. I think this was due to a number of factors including:
  • the novelty of being in a hammock
  • not having the hammock setup optimally
  • not sleeping as flat as I could have
  • only having a 3/4 length pad so I was somewhat cold
  • not staying on my pad very well which meant I was cold
My impression is that I can improve all these problems and get a much better night's sleep in a hammock with a bit more experience. I'd like to setup the hammock in daylight and spend some time playing with different configurations as well seeing how different positions inside the hammock felt. I think I can lie more asymmetrically across the hammock which would make it more comfortable. I would also use a full length sleeping pad to keep me warmer.

Although the manufacturer sells special cold weather insulation for the bottom of your hammock once you start adding that weight/bulk I suggest you might as well stick with a tent unless the terrain demands you hang off the ground. I'd probably not use this hammock in cold weather as losing body heat from above and below is just too much of a disadvantage over a tent. At a weight of 1.5lbs [less pegs] the hammock is lighter than my Big Agnes Seedhouse SL2 tent [~3lbs] if I am traveling alone. Although with two of us there was no weight savings in using hammocks over my tent. The tent also makes hanging out in wet weather a lot nicer if you are alone. Two people fill up my tent so there probably isn't much difference in that case.

On a funny note when we got up in the morning we realized we hadn't moved off the hiking trail all that far. We were maybe 50' from where people were walking in plain sight. One guy even walked off the trail to pee and was looking right at us, but we were behind our hammocks standing still trying not to laugh. With our bikes also behind the green/brown hammocks it seemed no one even noticed we were there. Clearly these hammocks are a good choice for stealth camping when you don't want any attention.

Overall all I'm happy with how the trial went considering our inexperience with this type of shelter. It adds an interesting option to my camping shelter arsenal. My plan is to use it on a longer bike tour so I can really get to know the ins and outs of hammock camping. That will let me make a better assessment of how I like it and what trips I'll take it on.

Friday, August 01, 2008

Dinotte 200L-AA Helmet Mount

I bought a helmet mount for my Dinotte 200L-AA lights, but haven't used it yet. The standard O-ring mount works very well on bicycle handlebars. It's a simple and elegant solution that is very easy to use. It does have the drawback of no side to side adjustment, but given the wide beam of the Dinotte 200L-AA that hasn't proven to be an issue. The helmet mount is easy to attach with two independent straps that centre the mount and a rubber pad underneath to keep it in place. The light can rotate up and down on the mount so you can aim it where you need the light. However, it took me both hands and some force to make a change with the light mounted so it won't be something you casually do with one hand while riding. On the plus side the light shouldn't fall out of adjustment easily. The battery pack is attached to the helmet with a velcro strap allowing you to place it towards the rear balancing the weight on your helmet.

I'll be using this setup tonight for the first time and will update this post tomorrow with some feedback.

On a sad note you know summer is on its way out when you break out a bike light in the Great White North.

Ride Update: The Dinotte 200L-AA performed well on our overnight tour this weekend. We each had one light. Mine was attached to my helmet and the other was attached to my partner's bars. I found the ability to move the light wherever I wanted it was very useful, but the extra weight on my helmet was noticeable. Overall one of these lights was enough to safely ride at moderate touring speeds [20-25kph] on good roads. On the downhills I think I'd want two [one on the bars and one on my helmet] to feel safe. We know this road quite well so doing 60kph+ with a single light wasn't a problem - although I don't think I would have been very happy to do that on unfamiliar roads. After a bit less than 2hrs on high my light switched to low as a power saving measure. The batteries were not at 100% charge when I started so I expect somewhat a longer ride time with fully charged batteries which is inline with their specs of a 2hr run time.

Improvements: If Dinotte Lights wanted to rock my world with the 200L-AA they'd come up with a focused lens that would concentrate the light down on the road as opposed to the current unfocused lens which shoots as much light up and int the sky as it does down where you need it. This would also make car drivers and other cyclists you meet happier as well since they wouldn't be blinded by your wasted light and it would effectively make the light brighter by putting more light where you actually need it.